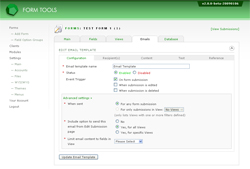
Configuration Tab
The configuration tab contains the main settings for your email template: the "meta" settings which determine how the email template should behave.
Email Template Name
This is used to help you identify the email template; it is only used internally and
doesn't appear in the email contents at all. You should use this field to try to
describe the email, e.g. "Administrator notification", "email sent to user",
"submission updated", "email sent to Accounting department", etc.
Status
Whether the email should be sent or not.
Event Trigger
This determines on which events the email should get sent. Currently there are only
three options: when the submission is first put through, when it is edited and when
it's deleted. You may also want to look at the next setting ("When sent") for related
functionality.
At the foot of the tab, there are also some additional fields grouped in an "Advanced Settings" section. We figured these settings may not be that useful for most people, so we tucked them away from public view.
When Sent
This is a very powerful setting! It lets you map an email template to a particular
View - but not ANY View: only Views that have one or more filters defined. Views let
you define ways to view subsets of all your form information; filters are special in
they limit the results themselves: e.g. if 100 submissions were put through, a View
with a filter may only show 50 of them.
This setting displays the dropdown of Views with filters since they are the only ones that are relevant in this case. The setting ensures the email only gets sent if the submission appears in the View. For example, say your form is collecting registrations for a university course and one of the fields is "are you an international student?". You could create a View called "International Students" that only contains international students. You could then create an email that ONLY get's sent to them by selecting the View in this field. Neat, huh?
This setting displays the dropdown of Views with filters since they are the only ones that are relevant in this case. The setting ensures the email only gets sent if the submission appears in the View. For example, say your form is collecting registrations for a university course and one of the fields is "are you an international student?". You could create a View called "International Students" that only contains international students. You could then create an email that ONLY get's sent to them by selecting the View in this field. Neat, huh?
Include option to send this email from Edit Submission page
This option should probably be pretty self-explanatory. It determines whether the
administrator and any client accounts can manually send the email directly on the
Edit Submission page. By mapping it to a particular View, you effectively control
the permissions. Only clients assigned to a particular View can therefore send the
email.
Limit email content to fields in View
This setting is NOT self-explanatory, so hopefully we can shed a little light on it!
As discussed above, the "When sent" setting allows you to map an email template to a
particular View. Because of this, it's altogether possible that the View you're
mapping it to only displays a subset of the form fields as well as having a filter
defined. Hence, it seems reasonable that you only want the email to contain those
fields in the View - not all fields defined in the form.
This setting limits the fields passed in the {$fields} variable to the Smarty loop in your email content to only those fields defined in the View. In other words, if you're using an email template created with any of the "Smarty Loop" options, the generated content will only contain fields in the View.
The need for this may not be immediately clear. After all, you can always customize the email contents by manually entering which fields should appear. However, as discussed elsewhere, there are several benefits to using a Smarty loop over the simple list of placeholders: one being that more information about the fields are passed via the Smarty loop, another being that if you ever change your View, the email template doesn't need to be manually updated.
