Setting up a PayPal-Enabled Form
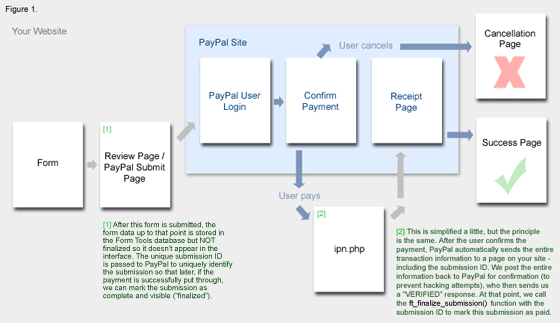
Let's start with a pretty, unintimidating diagram which outlines the whole process. I've simplified a few things (such as the fact that the user can cancel at any step) to keep it clear, but the overview is accurate. Click on the image for a larger view.
A few important points to note:
- All PayPal pages are wrapped in a blue box. These pages are pre-built by PayPal and reside on their servers - generally you don't have to worry about them very much. The pages in the grey box reside on your website. As you can see, when the user fills in and submits the form, they are redirected to and from the PayPal site to complete the transaction.
- PayPal offers a little control over the appearance of their pages to provide a little homogeneity for the user making the payment - but not much.
- The first form page - although a single page in the diagram - can be the final page in a sequence of pages, e.g. in a shopping cart process where they enter information bit by bit on separate pages. For simplicity - and because our Donation Form example only requires it - the form is only one page long for this tutorial. Speaking practically, it makes no difference.
- The "Review Page" is necessary step, but when the user reaches that step, they can be automatically redirected to PayPal if you wish. It is your choice whether or not you display any form submission content for review on that page. Since the donation form is a single page containing very few fields, I felt that this step was not necessary and made it automatically redirect with javascript.
