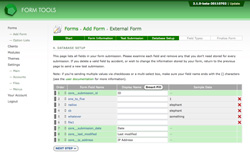
4: Database Setup
Form Management
So far so good! Form Tools has now received your test submission; most of the the technical stuff is done. You haven't quite reached the point where you're cracking open the champagne, but you're getting close!
Now it's mostly just a matter of configuring your form fields to make them look and behave like you'd expect. This step gathers information about your fields so that it can create a custom database table to store all future form submissions. Here's what all the columns and features of this page mean:
Order
This field determines the default order of your form fields as they will be listed
in the administration pages. Generally you'll want to arrange these in a logical manner,
but it doesn't terribly matter: every time the administrator or client looks at the form
data it will be through a View. Each View can be sorted in whatever way you want. To
reorder the rows, just move the mouse over the order column, click and drag the row
up or down. This sorting mechanism is used throughout Form Tools. The bars on the left
signify that you can group those rows. If you click in between the rows, the bars
will join and you can drag the (now joined) row. This can be handy if you're dealing
with a lot of rows and need to move groups of rows in one go.
Form Field Name
The name of your form field. This is included for reference, so you can see at a glance
what the row is all about.
Display Name
The display name should uniquely identify your field within your form. It should serve
as a simple label like "First Name", "Email", "Contact Phone Number" or something along
those lines. The Smart Fill button makes it's best guess at filling in the
display names based on the names you've given your form fields.
Tip: if you'd like the Smart Fill option to work as effectively, you'll need to format your form fields with underscore notation, like so company_name, first_name and email. These get Smart-Filled as Company Name, First Name and Email respectively. Smart Filling works by converting all underscores to spaces and then uppercasing the first letter of each word.
Tip: if you'd like the Smart Fill option to work as effectively, you'll need to format your form fields with underscore notation, like so company_name, first_name and email. These get Smart-Filled as Company Name, First Name and Email respectively. Smart Filling works by converting all underscores to spaces and then uppercasing the first letter of each word.
Sample Data
This column is again included just for reference: it shows the contents of the field
that was originally submitted.
