Extended Client Fields
Adding Fields
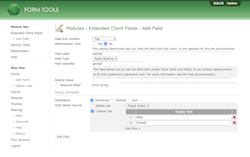
Adding your custom fields is really very simple. After installing the module (see explanation here), select the module and click on the "Add Field" link in the left-hand navigation menu. You should see a page similar to the screenshot to the right (the field options section only appears when you select a multi-select option like radios or checkboxes).
Here's what all the fields mean.
| Page and Location | This dropdown contains the five locations in the Edit Client pages (main tab and settings tab) where you can insert your new fields. See the Field Locations page for a visual representation of the locations. |
| Administrator Only | This makes the field only appear for the administrator - not the client. |
| Field Label | The label for the field (e.g. "Gender", "City" or something that specifies it's meaning). |
| Field Type | The form field type: textbox, textarea, radios, checkboxes, select, multi-select, password. |
| Field Identifier | This was added in 2.1.0. Field identifiers let you give a name to your field so you can use them in placeholders elsewhere in Form Tools. See the Placeholders page for more information. |
| Default Value | The default value for the field. If the field is a multi-select field like a group of checkboxes or multi-select dropdown, you can enter multiple default values by separating them with a pipe (|) character. For example, if there were three options: One, Two and Three, you could set One and Three as selected/checked by default by entering "One|Three" into this field. |
| Required Field | This line lets you add basic field validation to the field. Specifically, whether the field is required or not. Make sure that if you check the "Required Field?" checkbox, you enter the error message that should appear if the field is empty. |
